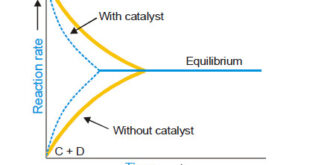
Equipment and Manipulations Associated with weighing
** The mass of many solids changes with humidity
because they tend to absorb weighable amounts of moisture.
** This
effect is especially pronounced when a large surface area is exposed, as with a
reagent chemical or a sample that has been ground to a fine powder. In the
first step in a typical analysis, then, the sample is dried so that the results
will not be affected by the humidity of the surrounding atmosphere.
** A
sample, a precipitate, or a container is brought to constant mass by a cycle of
heating (usually for one hour or more) at an appropriate temperature, cooling,
and weighing.
** This
cycle is repeated as many times as needed to obtain successive masses that
agree within 0.2 to 0.3 mg of one another.
** The
establishment of constant mass provides some assurance that the chemical or
physical processes that occur during the heating (or ignition) are complete.
(1) Weighing Bottles
** Weighing
bottles are convenient for drying and storing solids.
** Two
common varieties of these handy tools are shown in Figure blow.
** The
ground-glass portion of the cap-style bottle shown on the left is on the
outside and does not come into contact with the contents.
** This
design eliminates the possibility of some of the sample becoming trapped on the
ground-glass surface and subsequently being lost.
** Ruggedness
is a principal advantage of using plastic weighing bottles rather than glass,
but plastic abrades easily and is not as easily cleaned as glass.
(2) Desiccators and Desiccants
** Oven
drying is the most common way of removing moisture from solids.
** This
approach is not appropriate for substances that decompose or for those from
which water is not removed at the temperature of the oven.
** To
minimize the uptake of moisture, dried materials are stored in desiccators
while they cool.
** Figure
shows the components of a typical desiccator.
** The
base section contains a chemical drying agent, such as anhydrous calcium
chloride, calcium sulfate (Drierite), anhydrous magnesium perchlorate
(Anhydrone or Dehydrite), or phosphorus pentoxide.
** The
ground-glass surfaces between the top and the base are lightly coated with
grease to ensure a good seal when the top is in place.
** A
desiccator is a device for drying substances or objects.
** When
removing or replacing the lid of a desiccator, use a sliding motion to minimize
the likelihood of disturbing the sample.
** An
airtight seal is achieved by slight rotation and downward pressure on the
positioned lid.
** When
placing a heated object in a desiccator, the increase in pressure as the
enclosed air is warmed may be sufficient to break the seal between lid and
base.
** Conversely,
if the seal is not broken, the cooling of heated objects can cause a partial
vacuum to develop. Both of these conditions can cause the contents of the
desiccator to be physically lost or contaminated.
** Although
it defeats the purpose of the desiccator somewhat, allow some cooling to occur
before the lid is seated. It is also helpful to break the seal once or twice
during cooling to relieve any excessive vacuum that develops.
**
Finally, lock the lid in place with your thumbs while moving the desiccator
from one place to another.
Note: Very hygroscopic
materials should be stored in containers equipped with snug covers, such as
weighing bottles. The bottles remain covered while in the desiccator. Most
other solids can be safely stored uncovered.
(3) Manipulating Weighing Bottles
** Heating
at 105°C to 110°C for 1 hour is sufficient to remove the moisture from the
surface of most solids.
** Figure
shows the recommended way to dry a sample.
** The
weighing bottle is contained in a labeled beaker with a cover glass. This
arrangement protects the sample from accidental contamination and also allows
for free access of air.
** Crucibles
containing a precipitate that can be freed of moisture by simple drying can be
treated similarly.
** The
beaker holding the weighing bottle or crucible to be dried must be carefully
marked for identification.
** Avoid
touching dried objects with your fingers because detectable amounts of water or
oil from the skin may be transferred to the objects.
** Instead,
use tongs, chamois finger cots, clean cotton gloves, or strips of paper to
handle dried objects for weighing.
** Figure
shows how a weighing bottle is manipulated with tongs and strips of paper.
(4) Weighing by Difference
** Weighing
by difference is a simple method for determining a series of sample masses.
** First,
the bottle and its contents are weighed. One sample is then transferred from
the bottle to a container.
** Gentle
tapping of the bottle with its top and slight rotation of the bottle provide
control over the amount of sample removed.
** Following
transfer, the bottle and its residual contents are weighed.
** The
mass of the sample is the difference between the two masses.
** It
is essential that all the solid removed from the weighing bottle be transferred
without loss to the container.
(5) Weighing Hygroscopic Solids
** Hygroscopic
substances rapidly absorb moisture from the atmosphere and, therefore, require
special handling.
** You
need a weighing bottle for each sample to be weighed.
** Place
the approximate amount of sample needed in the individual bottles and heat for
an appropriate time.
** When
heating is complete, quickly cap the bottles and cool in a desiccator.
** Weigh
one of the bottles after opening it momentarily to relieve any vacuum. Quickly
empty the contents of the bottle into its receiving vessel, cap immediately,
and weigh the bottle again along with any solid that did not get transferred.
Repeat for each sample and determine the sample masses by difference.
(6) Weighing Liquids
** The
mass of a liquid is always obtained by difference.
** Liquids
that are noncorrosive and relatively nonvolatile can be transferred to
previously weighed containers with snugly fitting covers (such as weighing
bottles). The mass of the container is subtracted from the total mass.
** A
volatile or corrosive liquid should be sealed in a weighed glass ampoule.
** The
ampoule is heated, and the neck is then immersed in the sample.
** As
cooling occurs, the liquid is drawn into the bulb.
** The
ampoule is then inverted and the neck sealed off with a small flame.
** The
ampoule and its contents, along with any glass removed during sealing, are
cooled to room temperature and weighed.
** The
ampoule is then transferred to an appropriate container and broken.
** A
volume correction for the glass of the ampoule may be needed if the receiving
vessel is a volumetric flask.
Reference:
Fundamentals of analytical chemistry / Douglas A. Skoog, Donald M. West, F.
James Holler, Stanley R. Crouch. (ninth edition) , 2014 . USA
No comments